Electrics are the part of a van build that worries most first-time converters. Wood you can cut again; a badly sized cable or a missing fuse is a different matter. The good news is that a typical campervan 12V system is built from a handful of simple parts, and once you understand how much power you actually use, the rest of the decisions fall into place.
This guide is for people planning their first build or buying a converted van and wanting to understand what is under the seat. It is not a wiring diagram, and if you are unsure about any part of your install, get it checked by a qualified electrician.
The parts of a campervan electrical system
- Leisure battery. Stores power for the living area, separate from the van’s starter battery.
- Charging sources. Usually some combination of the engine (via a DC-DC charger), solar panels, and mains hook-up at campsites.
- Fuse box and distribution. Feeds and protects each 12V circuit: lights, pump, fridge, USB sockets, fan and heater.
- Inverter (optional). Converts 12V DC into 230V AC for household plugs. Useful for laptops, but power hungry.
- Battery monitor. A shunt-based monitor tells you how much charge you have left, far more accurately than a voltage reading.
Step 1: Work out your daily power budget
Everything starts with how much energy you use in a day, measured in watt-hours (Wh). For each appliance, multiply its power in watts by the hours you use it each day. A 10W LED strip used for 2.5 hours uses 25Wh. A compressor fridge cycles on and off, so use the manufacturer’s daily consumption figure rather than its peak wattage.
Here is a realistic example for a couple who work remotely from their van in spring:
| Appliance | Typical daily use | Energy per day |
|---|---|---|
| Compressor fridge | Runs on and off all day | 360Wh |
| Laptop charging | About 4 hours at 60W | 240Wh |
| Diesel heater (fan and pump) | Evenings and overnight | 120Wh |
| Roof fan | A few hours on low | 80Wh |
| Phones | Two phones, full charge | 30Wh |
| LED lighting | 2.5 hours at 10W | 25Wh |
| Water pump | Short bursts | 12Wh |
| Total | 867Wh |
Add 10 to 20% for losses in cables and the inverter. If you plan to run anything with a heating element (a kettle, hairdryer or induction hob) from your batteries, budget for it separately, because these appliances can draw 1,000 to 2,000W and will dominate your system design.
Step 2: Choose your battery
Battery capacity is usually quoted in amp-hours (Ah). To turn that into energy, multiply by the voltage: a 100Ah 12V battery holds about 1,200Wh. The key difference between battery types is how much of that you can actually use.
- Lead-acid and AGM. Cheaper up front, but regularly draining them below about half charge shortens their life considerably. Plan on using roughly 50% of the rated capacity, so a 100Ah AGM gives you around 600Wh.
- Lithium iron phosphate (LiFePO4). More expensive, but around half the weight, with a much longer cycle life and the ability to use most of the capacity. A 100Ah 12.8V LiFePO4 battery gives roughly 1,150Wh of usable energy. Most should not be charged below freezing unless they have built-in heating, which matters for winter van life in the UK.
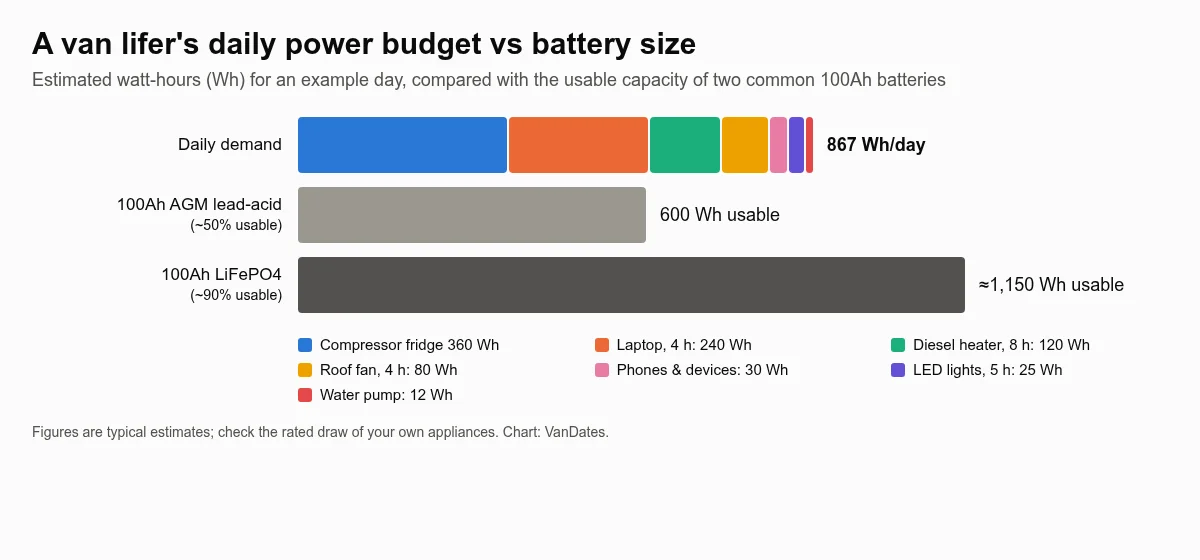
For our example couple, a single 100Ah AGM would be empty before the end of the first day. A 100Ah LiFePO4 covers a day with some margin, and many full-timers fit 200Ah or more of lithium so they can go two or three days without a good charge.
Step 3: Plan your charging
Charging while you drive
Most modern vans have “smart” alternators that vary their output, which can leave a leisure battery undercharged with an old-style split-charge relay. A DC-DC charger solves this and charges the leisure battery with the correct profile for its chemistry. A 30A DC-DC charger can put roughly 360Wh into your battery for every hour of driving.
Solar in the UK: be realistic
Solar output depends enormously on the season. In a sunny UK summer, a 200W roof panel might deliver somewhere around 500 to 800Wh on a good day. In December, the same panel may produce less than a tenth of that. Shade, panel angle and dirt all reduce output further. Solar is excellent for topping up in spring and summer and for keeping the batteries healthy while parked, but most UK full-timers rely on driving and the odd hook-up night in winter.
Use an MPPT solar charge controller, which converts panel output more efficiently than a cheap PWM controller, especially in the cool, cloudy conditions common in Britain.
Mains hook-up
A campsite hook-up lets you run a battery charger and 230V sockets. Because this is mains voltage, the installation needs an RCD, correctly rated cables and proper earthing, and it should be installed or checked by a competent electrician.
Safety: fuses, cables and mains
12V systems may feel harmless because they will not give you a shock, but a short circuit from a large battery can deliver hundreds of amps and start a fire in seconds. The essentials are:
- Fuse every positive cable as close to the battery as possible, sized to protect the cable, not the appliance.
- Size cables for current and length. Low voltage means high current, and long, thin cables waste energy as heat. Use a cable size calculator.
- Use proper crimped lugs and secure, protected cable runs, with grommets wherever cables pass through metal.
- Fit an isolator switch so you can disconnect the battery quickly.
- Treat 230V with respect. The charity Electrical Safety First has practical advice on electrical safety, and the National Caravan Council is the UK trade body for leisure vehicles if you want to find approved workshops to check your installation.
A sensible starter system
For a weekend van with LED lights, a fan, phone charging and a compressor fridge, a common starting point is a 100Ah LiFePO4 battery, a 20 to 30A DC-DC charger, 150 to 200W of solar with an MPPT controller, and a shunt battery monitor. Full-time remote workers usually double the battery and add more solar and a mains charger. Whatever you choose, start from your own power budget, not from a kit someone else bought.
Learn from other builders
The best electrical advice often comes from people who have already made the mistakes. VanDates is a community for people living and travelling on the road, with plenty of self-builders swapping notes on their systems. If you are just starting out, our guide for people new to van life is a good next read, and full-timers share how they keep powered through a British winter. Join for free to connect with other van lifers, and find more guides on Road Notes.